

Images and article by Pratik Panda

HDR imagery (HDR stands for High Dynamic Range) is a controversial topic when it comes to photography in general because the images produced can be rendered in a variety of different ways, including extremely high contrast images or images with very high saturation that might look like paintings. If you are a stock photographer, you do not really enjoy that freedom of playing with the contrast and saturation of your HDR toned images. More often than not, you will face rejections with reasons being over-processed image or noise/artifacts or chromatic aberration.
Here are some tips you may like to take care of while producing HDR images for your commercial stock photography portfolio:
- Bracket properly: Whenever possible, use Aperture Priority mode and set bracketing to +-2 of the normal 0 EV. The 0 EV may not be what the camera meters for you. If the scene is overly bright toned, you might want to set the base EV at +1 2/3. Note that for a good HDR, 0 EV is that level of exposure where none of the highlights is blown and none of the shadows are absolute black either.
- How many bracketed shots to make? This is not something to think about much. If you are shooting in RAW, all you need is 3 bracketed shots that are wide enough such that one shot has clipped shadows and one has clipped highlights. Usually +-2 EV is enough for this.But if you are shooting in JPEG, it is usually better to take 5 shots with maximum of 1 EV width between the exposures. Otherwise you may get banding in the gradients like blue skies or domes in modern architecture.
- Bracketing technique: This is relevant. You MUST bracket your shots such that only the shutter speeds are different in the shots and aperture does not change. If aperture changes, depth of field will change and you will get soft HDR images.
- Use a tripod, ALWAYS! Well that is an exaggeration. You can do HDR handheld (and sometimes you have no option when a tripod is not allowed). But then you need to be good with post processing and you should know how to align images in Photoshop before making an HDR. If you want fast HDR image production with minimum hassle and good sharpness, tripod is a requisite.
- Preprocessing the HDR: Do basic chromatic aberration problem removal and noise reduction (if needed) on all images before combining them to HDR. They worsen many times over in the final output if you don’t. This matters more for JPEGs.
- Tone mapping the HDR: Tone mapping the HDR is the hardest part when you are preparing an HDR image for submission to any microstock website. There is always a tendency to go past the acceptable limits of contrast and saturation. You can avoid this by comparing the tone mapped image with the neutral exposure. If it looks over processed, you will know.
- Before submitting: Before saving the image for submitting, make sure you have checked for the following problems:
- Ghosting (moving objects appearing twice or other such anomalies)
- Noise in darker areas and areas that have been processed relatively more.
- Inspect HDR images closely before submitting. Too high contrast makes patches or gives noticeable noise problems which will give you rejections.
- While taking HDR of sky/clouds, make sure you’re not exposing the sensor to direct sunrays for prolonged periods of time. By the time you set the camera, you may get damage done to the equipment.
WHEN to go for HDR images?
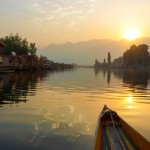
HDR photography is all about capturing different exposures of the same scene, right? But unfortunately we seem to forget it all the time. If you can notice differences in details of specific areas in different exposures, then HDR is the way to go for that scene. If one exposure exposes the whole scene properly, an HDR will not be of much use at all.
Whenever you shoot HDR images, make sure that the normal exposure (usually 0EV) has no/very little underexposed or over exposed areas. If most of it is under exposed, just set normal exposure at +1/3 or +2/3 EV, etc and then apply +-2 bracketing. No use shooting in HDR at all if you get the sky overexposed in all the shots! It causes a lot of disappointment later.
APPLICATIONS (best uses):
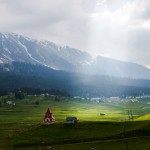
- Make boring scenes vivid and detailed, especially dramatic skies and landscapes.
- Long exposure shots like waterfalls or sea beaches with rocks.
- Product photography when you have no studio setup at home.
Related Posts
 The Smarter Way to Isolate Stock Photos in Photoshop
 10 Habits of a Successful Photographer
 A Beginner’s Guide to Buying Microstock
 The Difference Between Commercial and Editorial Images in Microstock
 14 Things to Know about Photoshop CC 2019
 Finding High Quality Stock Photos – Not Stock Photos That Suck
 The Impact of AI on Stock Photography
 The Impact of Diversity in Stock Photography on Inclusive Content Creation
 The Ethics of Stock Photography: Consent, Representation, and Copyright
 10 Must-Have Stock Photos for Every Blogger’s Library